Documentation
Stepwise Checklists for Jira: user guide
Everything the app does, in the order you will meet it: the checklist in a work item, templates, the workflow gate, search, and the details admins ask about.
On this page
Getting started
Stepwise Checklists is a Jira Cloud app. A Jira admin installs it from the Atlassian Marketplace and approves three permissions (they are explained under Permissions). After that there is nothing to switch on: the app is available in every space, company-managed and team-managed.
Jira admins find a short start guide inside Jira as well, under Jira settings → Apps → Stepwise Checklists.
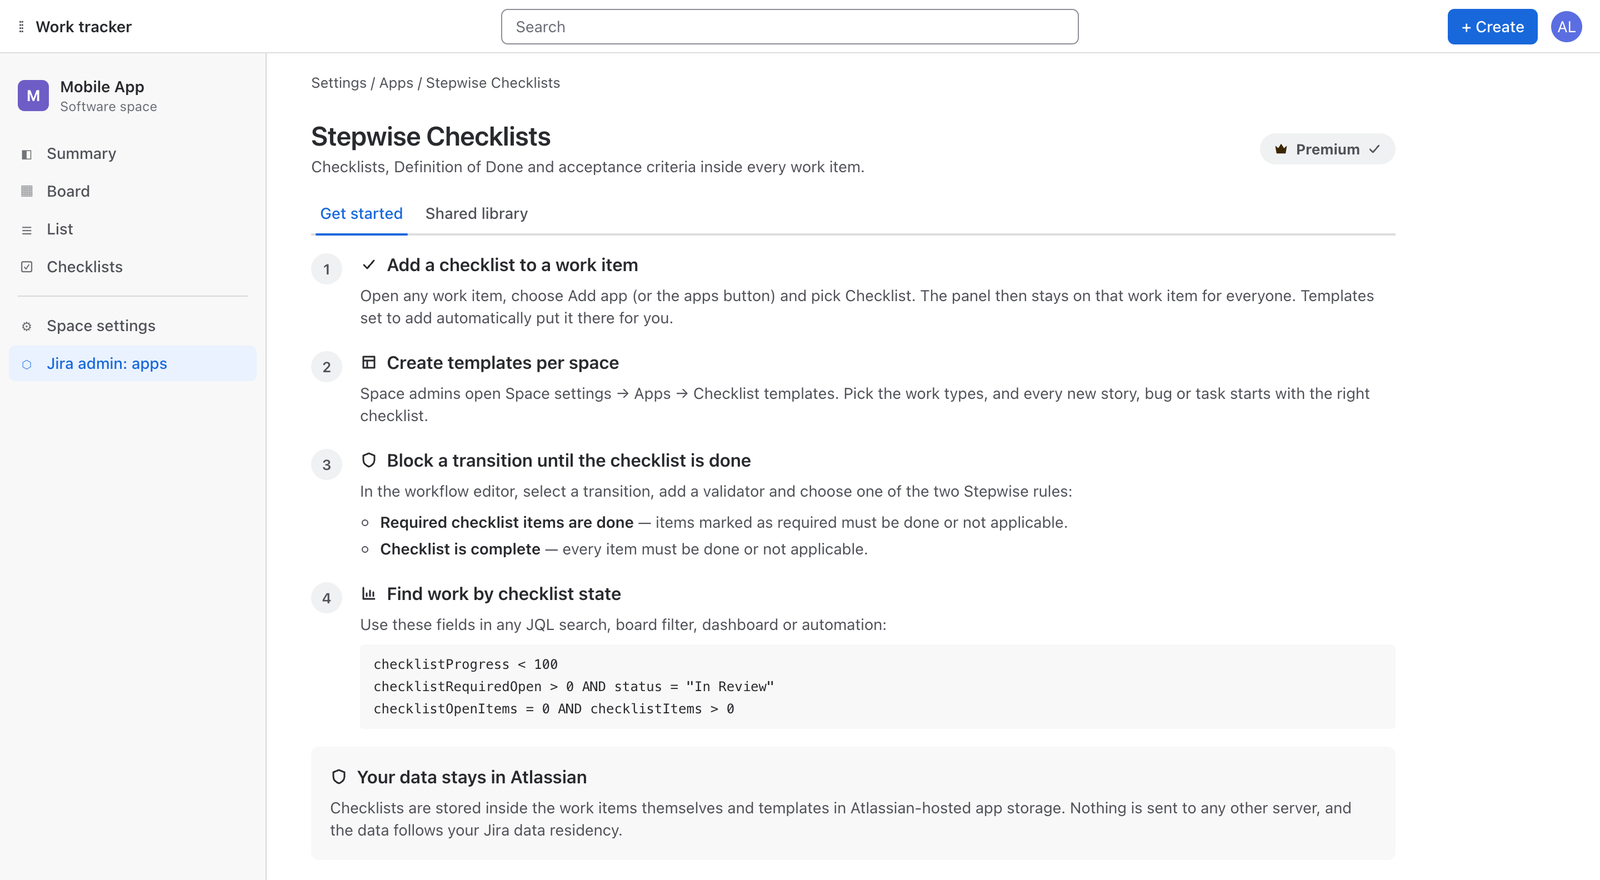
Add the panel to a work item
- Open any work item.
- Choose Add app (or the apps button) and pick Checklist.
- The panel then stays on that work item for everyone.
You only do this for work items that do not have a checklist yet. Templates that are set to add automatically put the panel there for you: see Automatic adding.
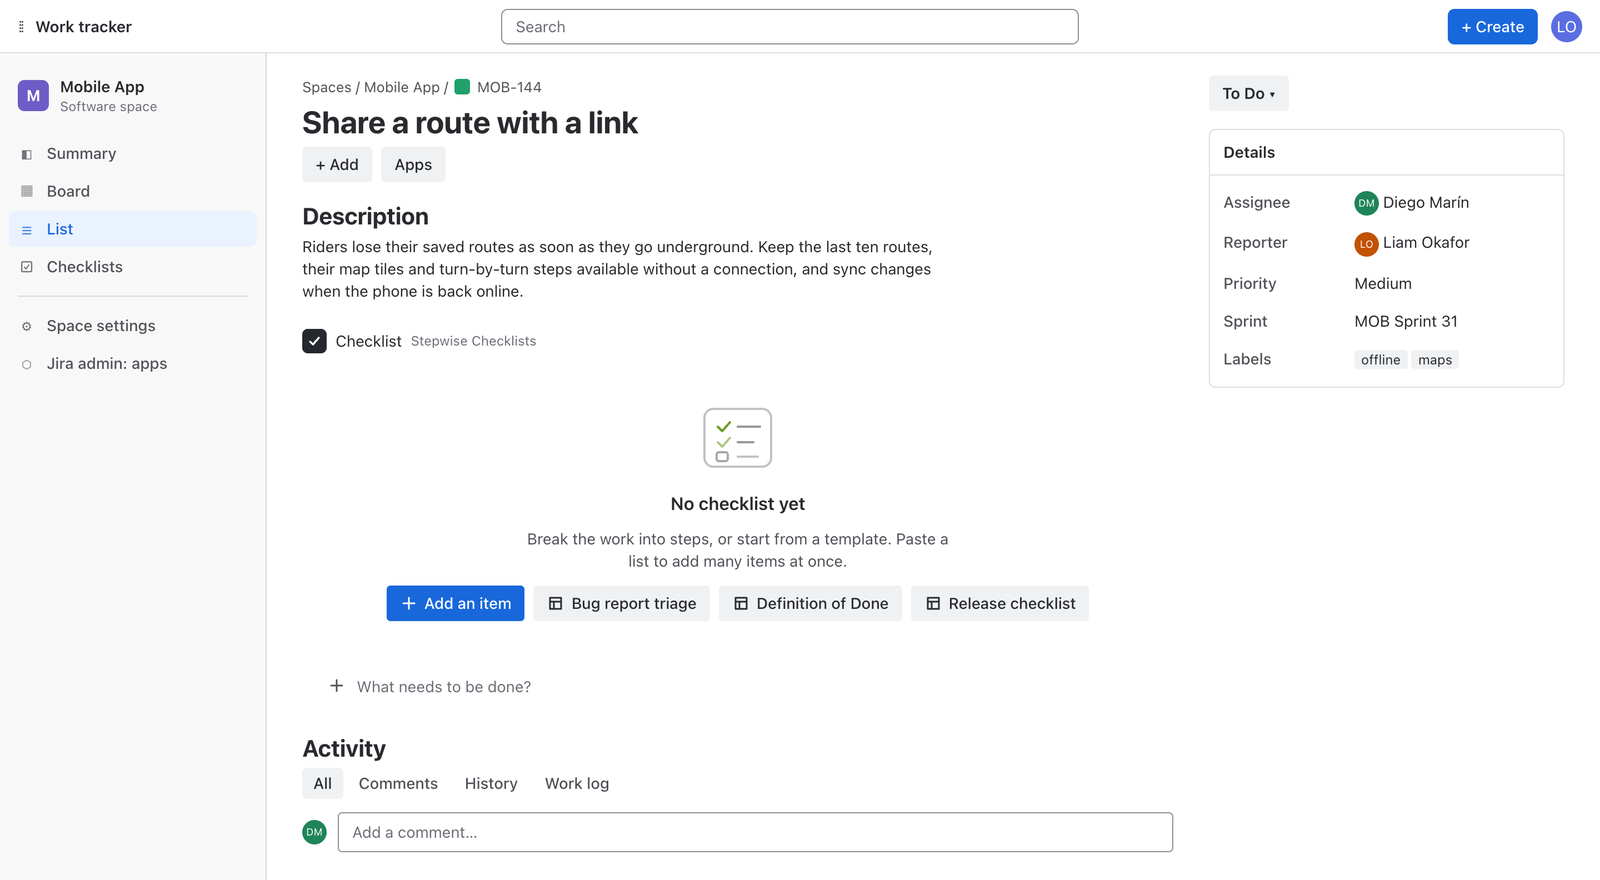
Your first checklist
An empty panel says “No checklist yet” and offers two ways to begin:
- Type the first step into the field What needs to be done? and press Enter. Keep typing: every Enter adds the next step.
- Or click one of the template buttons to start from a checklist your space admin has prepared.
The line above the checklist shows progress, for example “6 of 12”, and how many required steps are left. When nothing is open any more it says “Complete”.
Working with a checklist
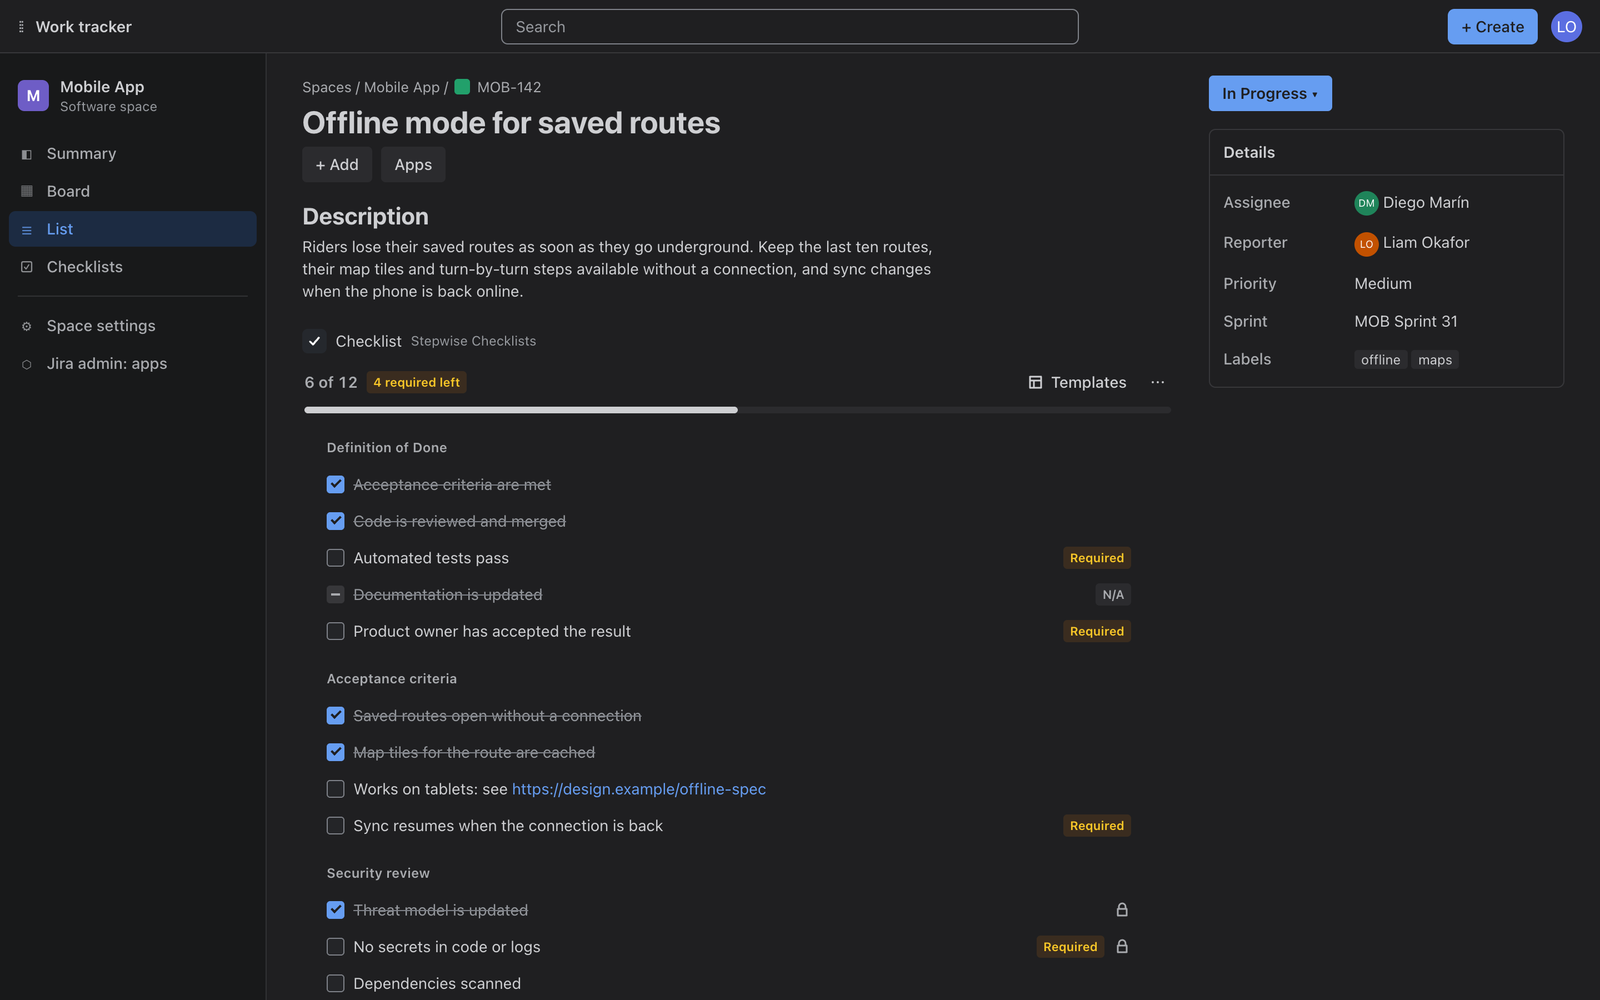
Steps
| To do this | Do this |
|---|---|
| Add a step | Type into Add an item at the bottom of the checklist and press Enter. |
| Add a section heading | Start the line with #, for example # Security review. Headings group steps and are not counted in progress. |
| Add a required step | Start the line with !, for example ! Automated tests pass. |
| Add many steps at once | Paste a list into the add field: one line becomes one step. See Paste a list. |
| Complete a step | Tick its checkbox. Tick again to reopen it. |
| Skip a step that does not fit | Open the step’s actions menu and choose Mark as not applicable. The step gets an N/A tag and counts as resolved. Reopen brings it back. |
| Make a step required or optional | Actions menu → Make required or Make optional. Required steps carry a Required tag. |
| Rename a step | Click its text, or focus the step and press Enter or F2. Enter saves, Esc cancels. |
| Turn a step into a heading, or back | Actions menu → Turn into a heading or Turn into an item. |
| Reorder | Drag the step by its handle, press Alt + ↑ or Alt + ↓, or use Move up and Move down in the actions menu. |
| Delete a step | Actions menu → Delete. |
A step can hold up to 500 characters. Web addresses in the text become links.
Paste a list
Copy a list from a document, a chat or a spreadsheet column and paste it into the add field. Every line becomes a step. Two marks at the start of a line are understood:
# Definition of Done
! Acceptance criteria are met
! Code is reviewed and merged
Documentation is updated
This adds one heading, two required steps and one ordinary step. Bullets, numbering and checkbox marks at the start of a line (-, *, 1., [ ], [x]) are dropped, so a list copied from a document or from Markdown comes in clean.
Actions for the whole checklist
The Templates button adds a template to the work item. The More checklist actions menu next to it holds the rest:
- Hide completed items / Show completed items
- Keeps only the open steps on screen. A line tells how many are hidden and brings them back with one click.
- Copy as text
- Copies the checklist to the clipboard, ready to paste into a comment, a message or another work item.
- Save as template
- Space admins only. Saves this checklist as a template so that everyone in the space can add it to their work items.
- Reopen all items
- Every step goes back to open. The steps themselves stay.
- Remove checklist
- Removes all steps from this work item. Protected steps that came from a template stay.
How progress is counted
Progress is the share of steps that are resolved: done or marked not applicable. Headings are not counted. A checklist is complete when it has at least one step and none of them is open.
Keyboard
| Keys | What happens |
|---|---|
| Enter in the add field | Adds the step and keeps the field ready for the next one |
| Esc in the add field | Clears the field |
| Enter or F2 on a step | Starts renaming |
| Enter while renaming | Saves the new text |
| Esc while renaming | Cancels |
| Alt + ↑ / Alt + ↓ | Moves the step up or down |
| Tab / Shift + Tab | Moves between steps, tags and menus, as everywhere in Jira |
Templates and automatic adding
A template is a reusable checklist: your Definition of Done, acceptance criteria, bug triage or release steps. Templates belong to a space and are managed by its space admins in Space settings → Apps → Checklist templates.

Create a template
- Open Space settings → Apps → Checklist templates.
- Click New template, or pick one of the six examples under Start from an example: Definition of Done, Definition of Ready, Acceptance criteria, Bug report triage, Release checklist, Code review. An example opens in the editor so you can adjust it before saving.
- Give it a name and, if you like, a description that is shown next to the name.
- Add the steps one by one with Add item, or use Paste a list: one line per step,
#for a heading,!for a required step. - Use the buttons at the end of each row to mark it as a section heading or as a required item, and to move or delete it.
- Click Save.
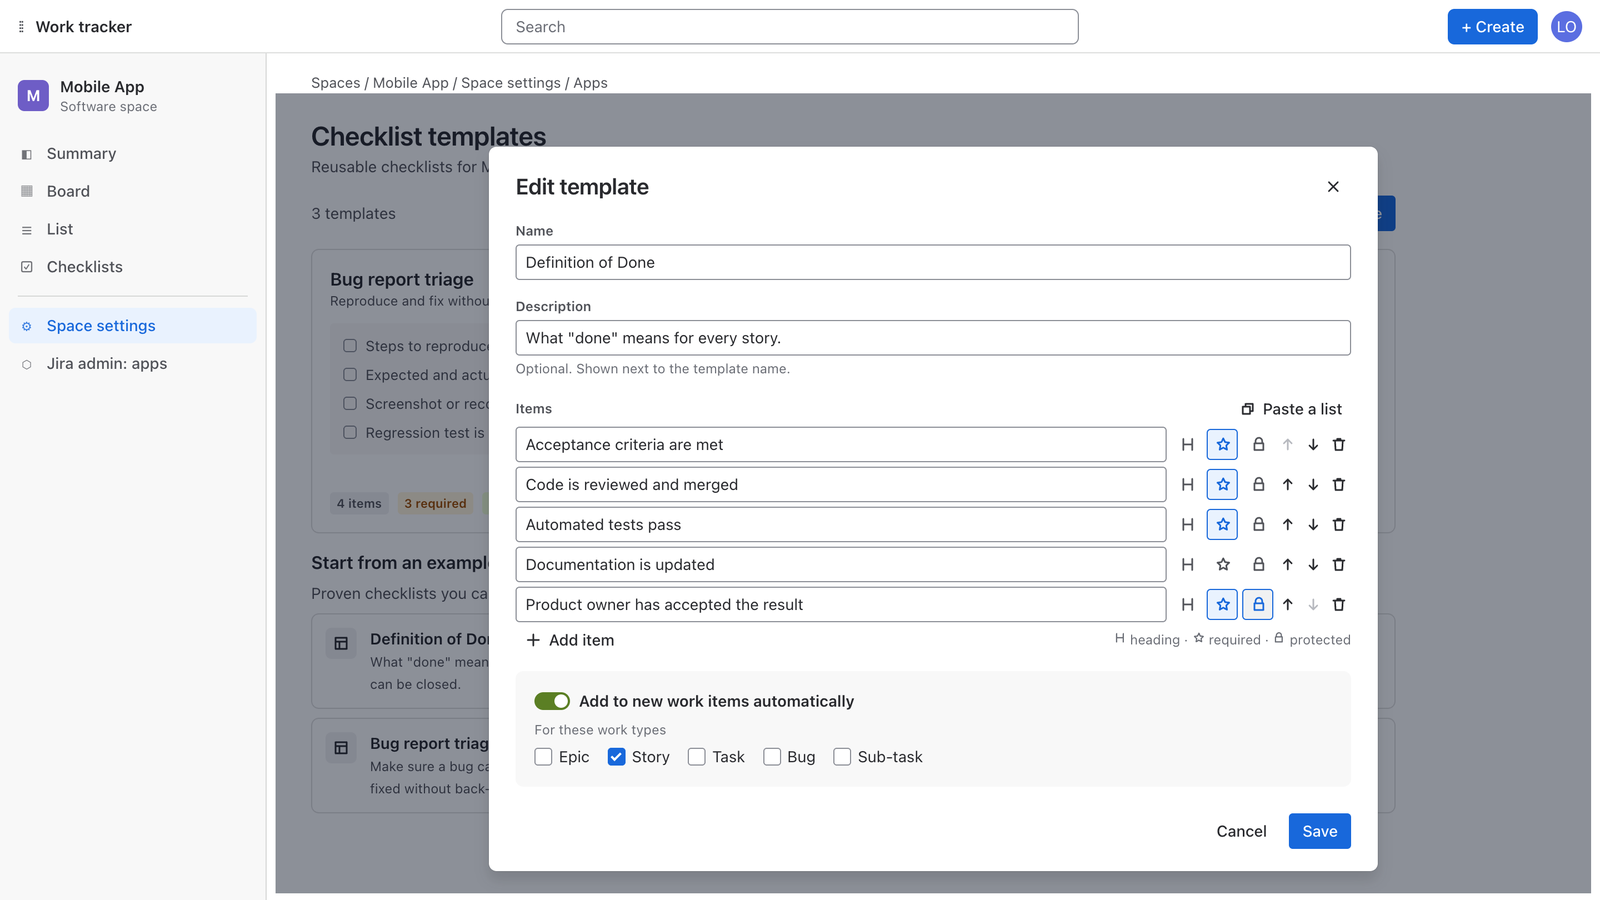
The menu on a template card lets you edit, duplicate or delete it. Deleting a template does not touch checklists that were already added to work items: they stay as they are.
You can also build a checklist in a work item first and then choose More checklist actions → Save as template.
Add a template to a work item
Anyone who can edit the work item can click Templates in the panel and pick a template. Its steps are added to the checklist. The menu lists the templates of the space under This space.
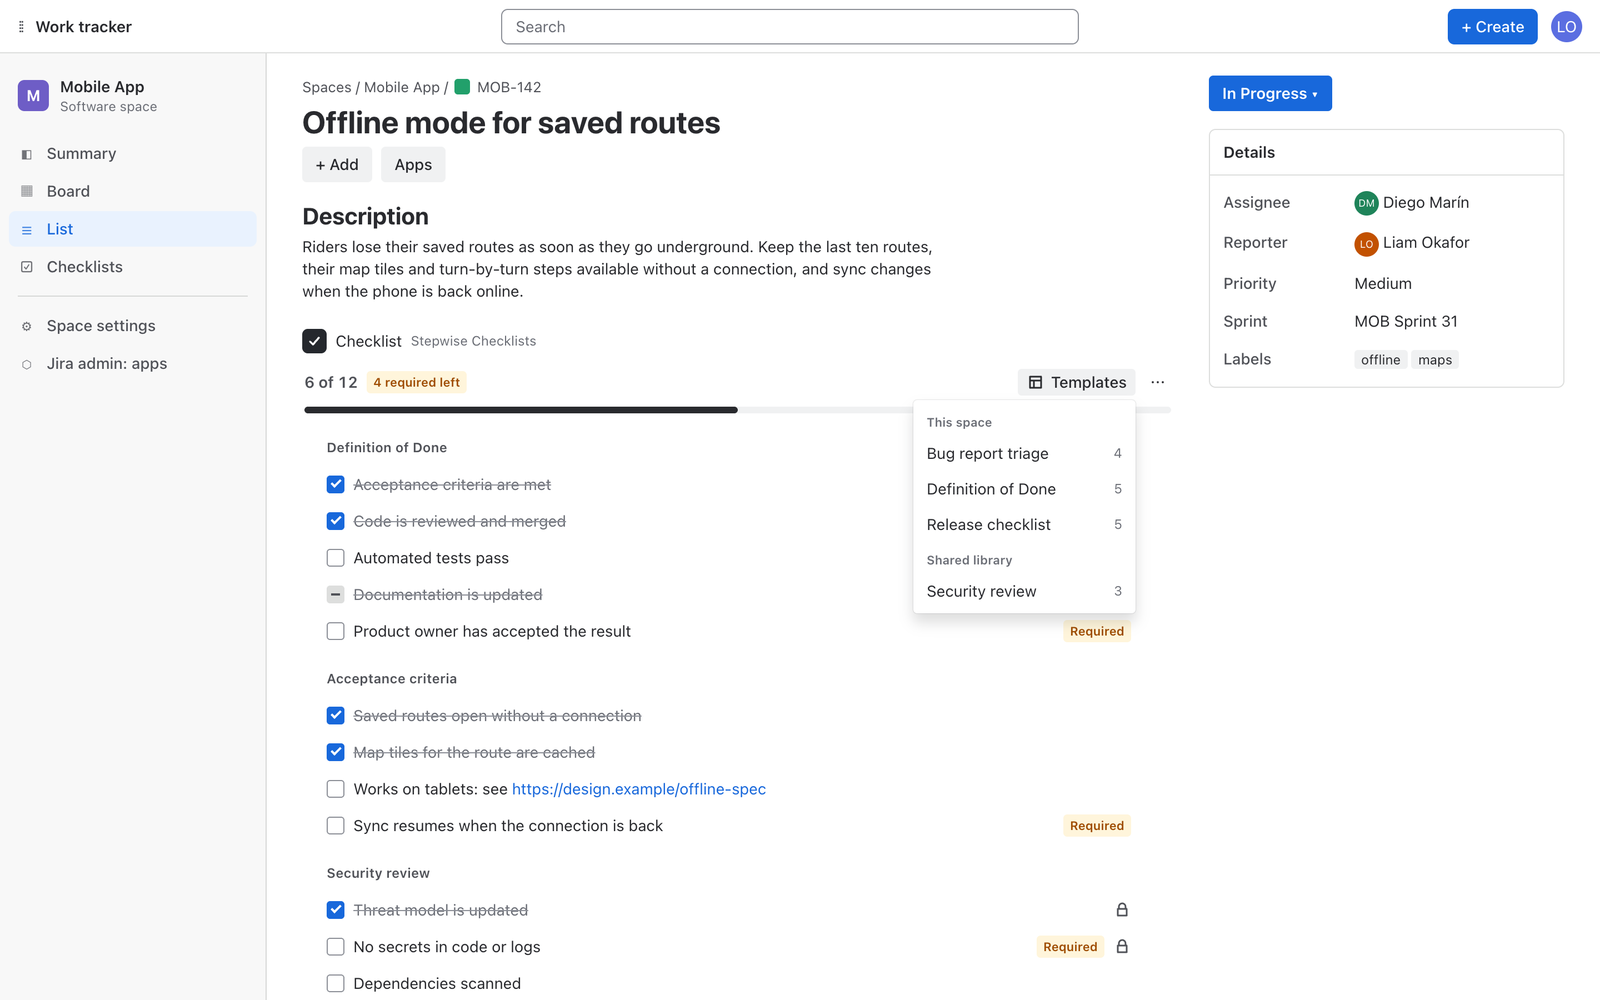
Automatic adding
A template can add itself to every new work item:
- Open the template in the editor.
- Switch on Add to new work items automatically.
- Under For these work types, tick the work types it is meant for, for example Story. With nothing selected the template applies to every work type.
- Save.
From then on, a work item of a matching type starts with that checklist as soon as it is created. A few things to know:
- It applies to work items created after you switch it on. Existing work items are not changed.
- If several templates match the same work type, all of them are added.
- Template cards show a tag such as “New: Story” so you can see at a glance what adds itself where.
Workflow gate
The app adds two validators to Jira’s workflow editors. A validator sits on a transition, for example the one into Done, and stops the transition while its condition is not met.
| Validator | The transition is allowed when | Message people see otherwise |
|---|---|---|
| Stepwise: required checklist items are done | Every step marked as required is done or not applicable. | Finish the required checklist items (or mark them not applicable) before moving this work item. |
| Stepwise: checklist is complete | Every step is done or not applicable. | Complete the checklist (or mark items not applicable) before moving this work item. |
A work item without a checklist always passes. The rules only hold back work that has open steps, so they are safe to add to a workflow that several teams share.
Company-managed spaces
You need to be a Jira admin, as for any workflow change.
- Open the workflow that your space uses in Jira’s workflow editor.
- Select the transition you want to guard, for example the one that leads to Done.
- Open the transition’s validators and choose to add one.
- Pick Stepwise: required checklist items are done or Stepwise: checklist is complete from the list. There is nothing to configure.
- Publish the workflow.
Team-managed spaces
You need to be an admin of the space.
- Open the space settings and then the workflow of the work type you want to guard.
- Select the transition, for example the one that leads to Done.
- Choose to add a rule and pick one of the two Stepwise rules from the list.
- Save the workflow.
Jira renames buttons in its workflow editors from time to time, so the labels on your site can differ slightly from the words above. The order stays the same: workflow, transition, add a validator or rule, pick the Stepwise rule, publish or save.
Good to know
- Add the rule to every transition that leads into the status you want to protect. A status can often be reached by more than one transition.
- “Not applicable” counts as resolved. A step that does not fit a particular work item never blocks it.
- Combine the gate with automatic adding: the template puts the required steps on new work, the validator makes sure they are finished.
JQL reference
Every checklist publishes four numbers that Jira indexes. Use them in any JQL search, board filter, dashboard or automation.
| Field | Value | Meaning |
|---|---|---|
checklistProgress | 0–100 | Percent of steps that are done or not applicable |
checklistItems | Number | Steps in the checklist (headings are not counted) |
checklistOpenItems | Number | Steps that are still open |
checklistRequiredOpen | Number | Required steps that are still open |
The fields are numbers, so they work with =, !=, >, >=, < and <=.
Examples
| Find | JQL |
|---|---|
| Work in review that still has required steps open | checklistRequiredOpen > 0 AND status = "In Review" |
| Any unfinished checklist | checklistProgress < 100 |
| Checklists that are complete | checklistOpenItems = 0 AND checklistItems > 0 |
| Closed work with open steps | statusCategory = Done AND checklistOpenItems > 0 |
| Checklists that are more than half done but not finished | checklistProgress >= 50 AND checklistProgress < 100 |
| Long checklists in one space | project = MOB AND checklistItems > 20 |
- Work items without a checklist have no values in these fields and are not matched by them.
- Jira updates its search index shortly after a checklist changes. A search run in the same second can still show the previous numbers.
- To use the fields in an automation rule, put the JQL into a JQL condition.
The Checklists page
Every space gets a Checklists page in its navigation. Everyone who can see the space can open it. It shows where every checklist in the space stands.

Overview tab
- Four tiles count the work items With a checklist, In progress, Waiting on required items and Complete. Click a tile to filter the table.
- The table lists each work item with its key, summary, status, progress and the number of required steps left. The key opens the work item.
- Refresh reloads the numbers.
- The page shows the 500 most recently updated work items that have a checklist. For anything beyond that, use the JQL fields.
Insights tab
The second tab, Insights, is described under Premium features.
Premium features
Premium is the Advanced edition of Stepwise Checklists on the Atlassian Marketplace. It is meant for teams that run the same standards across many spaces, and adds three things. A Jira admin can switch editions at any time.
Shared library
Templates that every space can use: one Definition of Done or security review for the whole company, managed in one place.
- Jira admins manage it in Jira settings → Apps → Stepwise Checklists → Shared library. The editor is the same as for space templates.
- Shared templates appear in the Templates menu of every work item, in every space, under Shared library.
- A shared template can also be set to Add to new work items in every space automatically, for all work types or for the ones you tick.
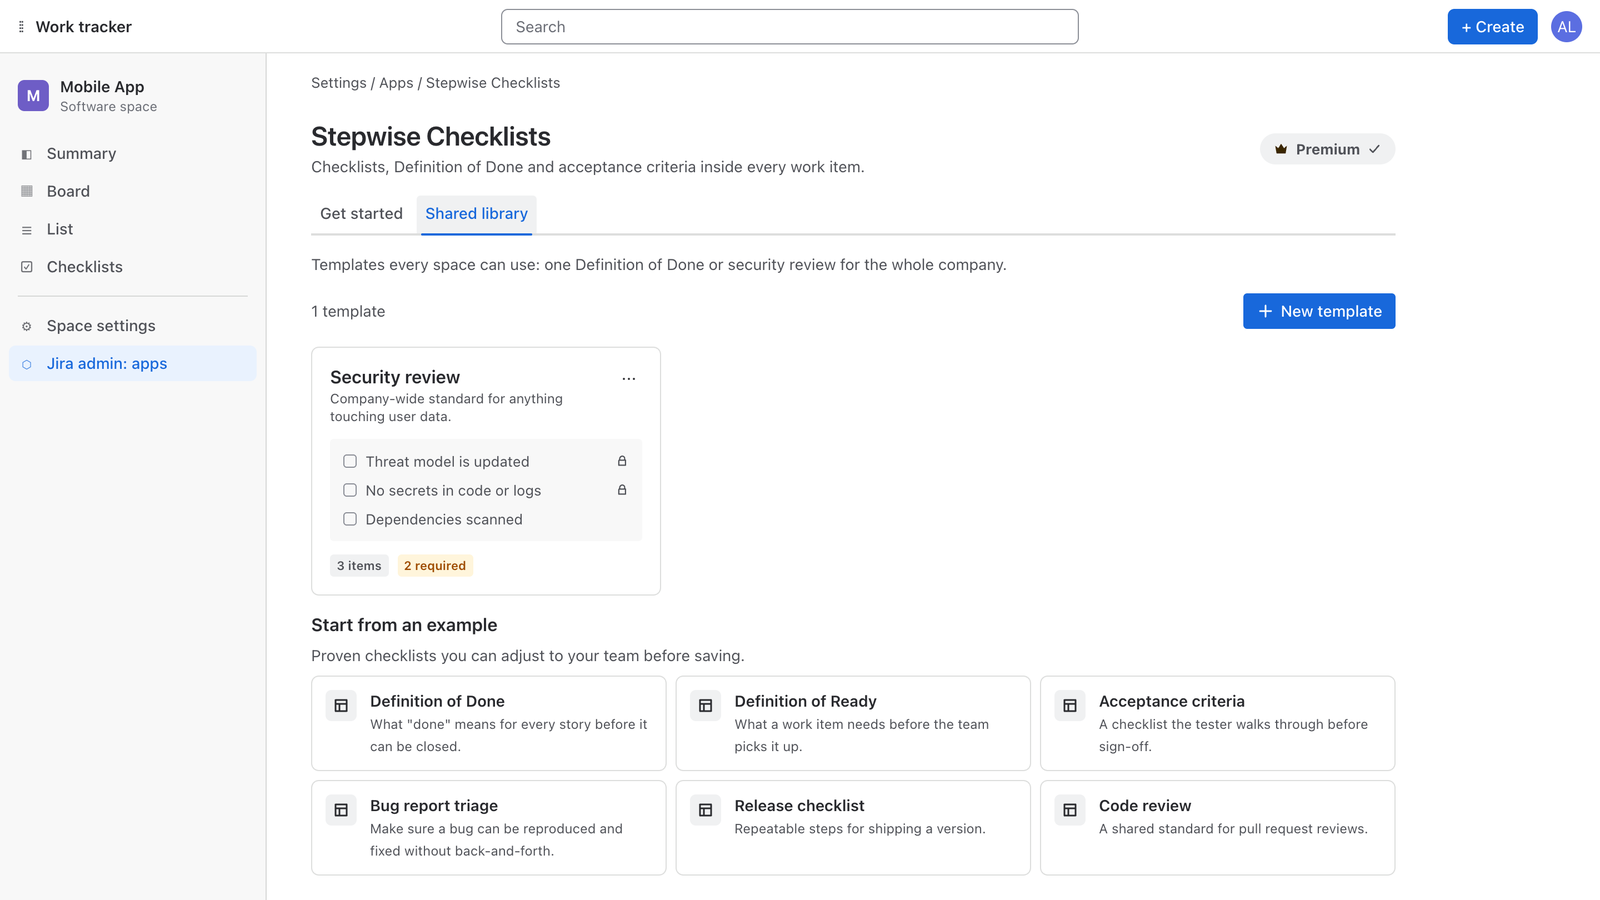
Protected items
In the template editor, the lock button marks a step as protected. Once that template is added to a work item, a protected step cannot be renamed, removed, made optional or turned into a heading there. It shows a small lock, and Remove checklist leaves it in place. People still tick it like any other step, can mark it not applicable when it does not fit, and can move it.
Use protection for the steps that must not be edited away, such as a security or compliance check, and leave the rest of the checklist flexible.
Insights
The Insights tab of the Checklists page shows where work gets stuck in a space, so you can fix the process, not chase people.
- Tiles: Average completion, Not started, Closed with open items, Waiting on required items.
- Most often left open: steps that slow work down, or that people forget.
- Most often marked not applicable: candidates to remove from the template or make optional.
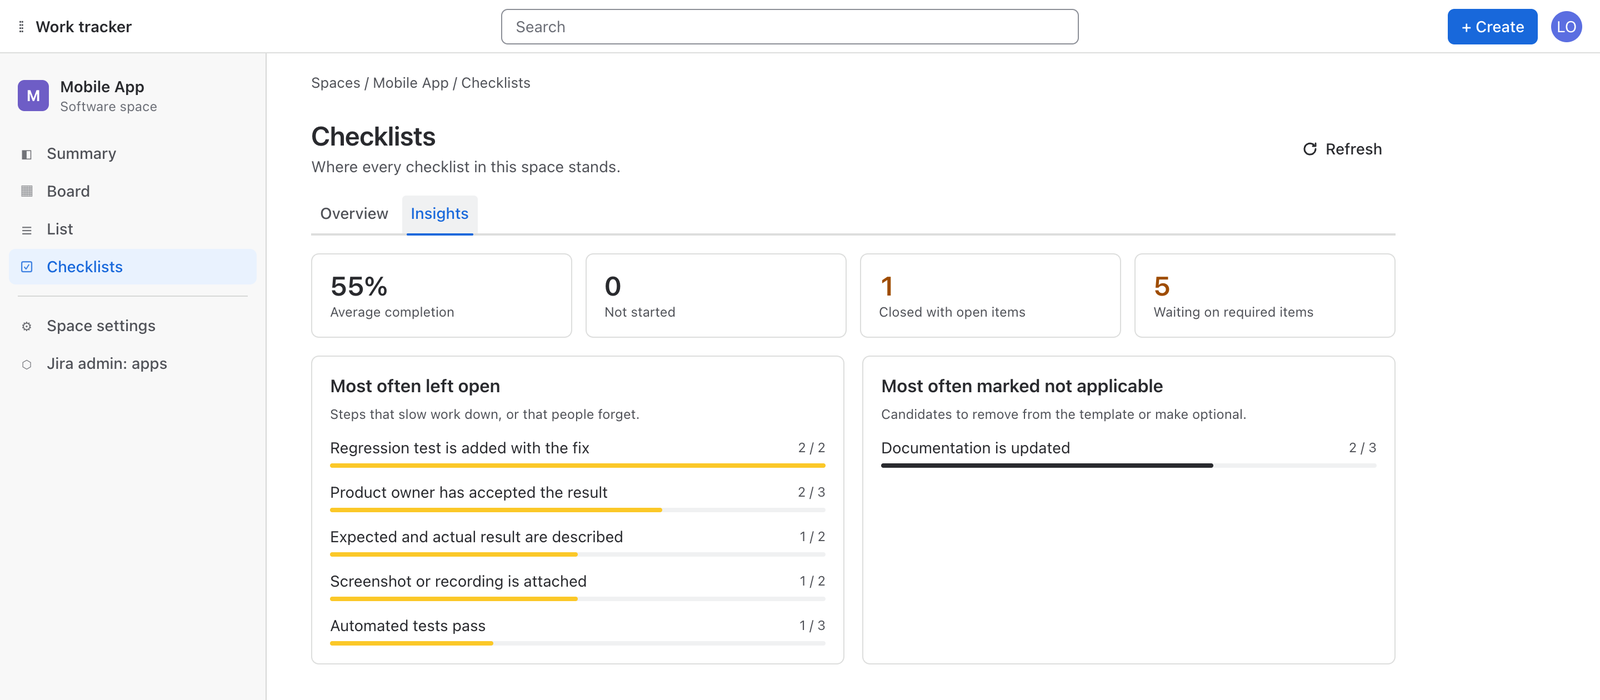
If a site moves back to the Standard edition, shared templates are kept but no longer offered to the team, and a Jira admin can still delete them. Protected steps that are already in work items stay as they are.
Permissions
Who can do what
The app has no permission settings of its own. It follows Jira.
| Action | Who |
|---|---|
| See a checklist | Anyone who can see the work item |
| Add, tick, edit and reorder steps; add a template to a work item | Anyone with Jira’s “Edit work items” permission for that work item |
| Create, edit and delete templates of a space; save a checklist as a template | Space admins |
| Open the Checklists page of a space | Anyone who can see the space |
| Manage the shared library | Jira admins |
| Add a Stepwise validator to a workflow | Whoever may edit that workflow in Jira: Jira admins for company-managed spaces, space admins for team-managed spaces |
People who can view a work item but not edit it see its checklist read-only.
What the app is allowed to do
When the app is installed, Jira asks the admin to approve three permissions:
| Permission | Why the app needs it |
|---|---|
read:jira-work | To read work items, their checklist, the spaces and what the current person is allowed to do |
write:jira-work | To save the checklist on a work item |
storage:app | To keep templates in Atlassian-hosted app storage |
Limits
| What | Limit |
|---|---|
| Steps in one work item, headings included | 150 |
| Length of one step | 500 characters |
| Steps in one template | 80 |
| Templates in one space | 50 |
| Templates in the shared library | 100 |
| Template name | 80 characters |
| Template description | 300 characters |
| Work items listed on the Checklists page | The 500 most recently updated |
The step limits exist because a checklist is stored in one Jira issue property, and Jira caps the size of a property. When a checklist is full, the panel says so and asks you to remove a step before adding another.
Data and security
- A checklist is stored inside its work item, as the Jira issue property
stepwise.checklist. It moves, archives and gets deleted together with the work item. - Templates are stored in Atlassian-hosted app storage (Forge storage).
- Nothing is sent to any other server. There are no external services, no analytics and no third parties.
- The app stores checklist text, the state of each step and the time a step was completed. It does not store account ids, names or emails.
- The data follows your Jira data residency.
- If the app is uninstalled, templates are removed with it. Checklists remain in the work items as issue properties, and reinstalling the app shows them again.
More detail, including an architecture diagram: Security and data. Legal wording: Privacy policy.
Troubleshooting
- I do not see the checklist on a work item
- The panel is added per work item. Choose Add app (or the apps button) on the work item and pick Checklist. If you cannot find it there, ask a Jira admin whether the app is installed on the site.
- The checklist is read-only
- You can view the work item but do not have Jira’s “Edit work items” permission for it. If the panel shows the note “Checklists are read-only” for everybody, the app’s licence on the site is not active: everything stays visible, and a Jira admin can restore editing under Jira’s app management.
- I cannot rename or delete one of the steps
- A step with a lock icon is protected: it comes from a template whose owner decided it must stay as written. You can still tick it or mark it not applicable.
- I cannot add another step
- A checklist holds 150 steps. Remove one to add another, or split the work into several work items.
- A template was not added to a new work item
- Check that Add to new work items automatically is switched on in the template, that the work type is ticked (or none at all), and that the work item was created after you saved the template. The checklist is added moments after creation: reload the work item if you opened it immediately.
- The Templates menu says “No templates yet”
- The space has no templates. A space admin can create them in Space settings → Apps → Checklist templates.
- Jira refuses a transition with a Stepwise message
- That is the workflow gate doing its job. Finish the open steps or mark them not applicable, then move the work item again.
- A JQL search with a checklist field returns nothing
- Work items without a checklist are not matched by these fields. Check the spelling of the field (
checklistProgress,checklistItems,checklistOpenItems,checklistRequiredOpen) and give Jira a moment to index a checklist that was just changed. - “Copying is blocked by the browser”
- Your browser did not allow access to the clipboard. Allow clipboard access for your Jira site in the browser settings and try Copy as text again.
- “The checklist could not be loaded”
- Click Try again or reload the page. If it keeps happening, write to support and tell us what you see.
On the roadmap
These are not in the app today. We list them so that you know what to expect and what not to look for yet. There are no dates attached.
- Rules that act on a status change
- A progress field for board cards
- A dashboard gadget
- History of who completed a step
- Translations of the interface (it is in English today; checklist text can be in any language)
Missing something else? Tell us.